Posts tonen met het label gelli-arts colourstock. Alle posts tonen

zaterdag 9 januari 2016

Gelli-plate play........mini hexagons


Hi there,

Today some play rounds with the mini Gelli-plate hexagon shape and some backgrounds made on the A4 Gelli-plate......
I have used the Distorted hive stencil (Tando) which creates a very cool effect........
I will show just some step by step photo's and this time two very simple cards.......

I used ARA acrylic paints and a speedball brayer.

ARA colors:

M530-Metallic Yellow light
M260-Gold
A1-Titanium white
C292-Sap green Lake extra


Hallo allemaal,

Vandaag wat Gelli-plate speel plezier........met de nieuwe mini Hexagon gelli-plate en wat grotere achtergronden met de vierkante Student en de grotere A4.
Ik heb hier het gave  Distorted hive stencil (Tando) gebruikt wat een heel leuk effect geeft.
Hieronder volgen wat stap voor stap foto's en twee heel simpele kaarten met alleen de mini hexagon.
De gebruikte ARA acryl verf zie je hierboven genoemd.


This is a first print, colors are vibrant

Een eerste print, kleuren zijn helder en vol
and a second(ghost) print adding some white 
voeg wat wit toe over een restant verf en je krijgt een mooie ghost print

just playing around with yellow gold and green
even wat spelen met groen en goudgeel


another bee-hive stencil (Crafters workshop)


here you can see some left-over paint, adding some white paint and you will have a lovely soft print

now onto a larger background.......

nu naar een wat grotere achtergrond(student formaat)

using the distorted hive stencil, blotting some areas with a paper towel
weer het distorted hive stencil en wat gedeeltes weg gedept met een tissue papier

 here you can see the blotted areas very well, I put the square (student) Gelli-plate onto an acrylic bloc so I can stamp with it....

hieronder kun je de weg gedepte gedeeltes goed zien, ik heb de vierkante GP(student formaat) op een acrylblok geplakt zodat je er ook mee kunt stempelen.....
deze print is de dan de eerste en behoorlijk vol en fel
residue of paint, adding some thin layer of white paint over it........

restant verf, voeg daar overheen witte verf toe in een dunne laag
and than this is the result, a lovely soft toned print........ 

en dat is dit het resultaat, een mooie zacht gekleurde print.....
terug naar de mini hexagon, breng groene verf aan, stencil erop, beetje verf weg deppen....klaar om te printen
 back to the mini hexagon, adding green paint, stencil on top and blotting a bit........ready for print


print it onto the  elli-printed background
I did not finish this one yet but I have made two simple cards using only the mini Hexagon gelli-plate.......

druk af op de GP achtergrond
Ik heb deze nog niet afgemaakt maar twee simpele kaarten gemaakt met de mini hexagon....


Than of course I could not stop playing and made several backgrounds........just thought to share that too, will sure use them in time.......you can combine them perfectly with Pan Pastels or acrylic markers and color pencils....... glue them in your Art Journal .......so many possibilities!

Toen, natuurlijk....kon ik niet stoppen met spelen en heb diverse grote achtergronden gemaakt met de A4 Gelli-plate, wilde dat even delen....je kunt dat zo veelzijdig gebruiken.......snij er leuke vormen uit met je mallen(bijpassende bloemen of zo) of verwerk verder met Pan Pastels, acryl markers, kleurpotloden of plak in je Art Journal.....zoveel mogelijkheden!


I found this very lovely cute cat stamp in my stash, don't know the brand anymore......the text say: Be who you are, that is real happiness! Well, I think a cat really makes that saying true!

Ik vond deze superleuke kat in mijn stempel archief, weet het merk niet meer.......en de tekst past zo goed bij een kat, die is zeker helemaal zichzelf!
De tekst is van de Stamping Cottage.
And a bit more artsy........text is from Chocolate Baroque(Artistic Affirmations), the brushes and spatters are from Impression Obsession .The coffee splotch van Prima Marketing.

 En een wat meer art-style kaart, tekst van Chocolate Baroque(Artistic Affirmations), de kwasten en spetters van Impression Obsession. De coffee splotch van Prima marketing.
Well, hope to have inspired you with my Gelli-plate play.........
Have a creative day!

Zo, ik hoop je geïnspireerd te hebben met mijn Gelli-plate avonturen
Ik wens je een creatieve dag!


donderdag 10 december 2015

Gelli-plate inspirations


Hi there Gelli-plate fans,

Miranda here with some new Gelli-plate inspiration........many layers.....so take your time, have a seat and a cup of coffee or tea! I've made these a while ago so I had to do a lot of thinking.....what came first, second etcetera........
And again I took one of my favorite stencils at the moment.......circles and a woman.......and than the quote enters my mind........which I had seen some while ago:

A woman is the full circle.
Within her is the power to create, nurture and to transform
Dianne Mariechild

I have used the A5 Gelli-plate and some ARA acrylic paints. I have started using ARA M260 gold.
Spreading the paint with a Speedball soft brayer over the Gelli-plate


Hallo daar Gelli-plate fans,

Miranda hier met wat nieuwe Gelli-plate inspiratie.......veel lagen.......dus neem de tijd, ga er even voor zitten en neem een kop koffie of thee! Ik heb deze al een tijdje geleden gemaakt dus ik moest wel even nadenken...wat kwam er eerst...veel foto's om uit te zoeken.....
En ik heb weer een van m'n favoriete stencils gebruikt van dit moment, cirkels en een vrouwenfiguur en toen schoot me ineens deze quote te binnen die ik eens ergens had gelezen:

A woman is the full circle.
Within her is the power to create, nurture and to transform
Dianne Mariechild

Ik heb hier de A5 Gelli-plate gebruikt en wat verschillende kleuren ARA acrylverf. Ik ben begonnen met de ARA M260 gold. De verf over de GP uitgerold met de Speedball soft brayer.

Stencil/Mask woman- Crafters workshop
Than I have placed the bubbles stencil (Dutch Doobadoo) over the painted surface( you can see some orange paint on the other side of the stencil, watch what it does after I pulled the 1st print)

Toen heb ik het bubble stencil(Dutch Doobadoo) over de verflaag heen gelegd. Je kunt nog wat van de oranje verf zien aan de achterkant van het stencil en dat komt er dan ook mee vanaf bij het maken van de 1e print.


I blotted some areas to remove some of the paint and than removed both stencil and mask
Ik heb wat gedeeltes gedept om verf te verwijderen uit de bubbles en daarna stencil en masker verwijderd.
Zo ziet het er dan uit.


this is the 1st print, you can see the large orange balls also here.......
dit is de 1e print, je kunt hier goed de oranje grote cirkels zien van het restant verf aan de achterzijde van het bubbles stencil


back to our Gelli-plate, apply some ARA D137, Blood Red Lake paint and put the mask back on. Spread the paint with the brayer
Weer terug naar onze Gelli-plate, breng wat ARA D137 Blood Red Lake aan en leg het masker er weer op. Verspreid de verf met de brayer.


Put the stencil with the large cirkels over the top
Leg het stencils met de grote cirkels er weer op

Blot the areas with a kitchen towel to remove the paint in the cirkels,
remove the stencils
Dep met een stukje keukenrol om de verf uit de cirkels te verwijderen
verwijder stencil en masker

Position the Gelli-plate over the 1st print(above) and 
'stamping'  the next print
This is how it came out, still leaving the figure blank
* you can only do this when the Gelli-plate is attached to an acrylic bloc!

Plaats de Gelli-plate over de 1e print (zie boven) en ' stempel' de volgende print.
Zo kwam het eruit, het figuur is nog blank
* dit kan alleen als de Gelli-plate bevestigd is op een acrylblok!
*TIP: ik heb hier een groot acrylblok gebruikt dat ik toevallig had maar anders kun je ook een B-plaat gebruiken van een stansmachine.

Put the stencil of the woman figure on top of the Gelli-plate, cover the area of the other small figure
Apply some blue ARA paint with the brayer(A35, Phtalo blue)

Plaats het stencil van het vrouwenfiguur op de Gelli-plate en bedek het andere figuur wat op het stencil staat.
Breng de ARA Phtalo blue aan en rol uit met de brayer

Place the flower stencil(Dutch Doobadoo) on top of it
Plaats het bloemenstencil(Dutch Doobadoo) erover


Blot the areas in the woman figure,
this is how it came out after removing all stencils

Dep gedeeltes weg van de verf in het vrouwenfiguur met een tissue
zo kwam het er uit te zien na verwijderen van de stencils


Position the Gelli-plate on top of the print,
this is what happened, the figure has got a pattern now

Positioneer de Gelli-plate over de print en druk af
dit is wat er gebeurt, het patroon verschijnt in het vrouwenfiguur


I skipped some steps here, place the mask of the woman and add some Titanium white ARA paint over it.
Than add the flower mask and blot some of the areas
Remove the stencil

Ik heb hier wat foto stappen over geslagen, plaats het masker van de vrouw en breng ARA Titanium white aan
Dan verwijder je het vrouwenmasker en dep wat van de witte verf weg
verwijder ook dit stencil

Press the Gelli-plate on top of the print

Druk weer af met de Gelli-plate op de print

This is how it came out........lots of layers mmm? The step I did not photographed was when I used a fun gaze with large holes. I did partially put some blue paint on the Gelli-plate where I did want to create this effect and pressed the gaze in it and blotted some areas. Than I removed the gaze and pressed the GP onto the print. This created the fun blue gaze structures.

Zo kwam de uiteindelijke print eruit, veel lagen he? De stap die ik niet op foto heb gezet was met een leuk gaas met grote gaten. Ik bracht gedeeltelijk wat blauwe verf aan op de GP waar ik het effect wilde maken op de print. Hierop legde ik het gaas en depte wat gedeeltes weg. Hierna verwijderde ik het gaas en drukte de GP op mijn print. Dit creëerde de leuke net-achtige blauwe structuur.

Than I added some interest with 3 matching colors of the Molotov marker, an acrylic paint which works very nice.
Toen bracht ik wat accenten/schaduwen aan met 3 bijpassende Molotov markers, een acrylverf in markervorm die erg fijn werkt.


Than I stamped a beautiful quote and embossed a swirl using gold embossing powder

Toen heb ik een mooie quote gestempeld en een swirl geembosst met goud embossingpoeder.


Well, I hope I haven't lost you in between layers LOL, but I can imagine that it dazzles you a bit........next post I will be back with some very simple Gelli-plate inspirations....using the great new small shapes! Hope to see you than, in the mean time.......stay creative and have fun!

Zo, ik hoop je onderweg niet kwijt geraakt te zijn tussen de vele lagen LOL, maar ik kan me goed voorstellen dat het je een beetje duizelt.......de volgende post laat ik jullie wat hele simpele Gelli-plate inspiraties zien die ik gemaakt heb met de leuke nieuwe kleine vormen! Hoop je dan weer te zien en in de tussentijd, blijf creatief en heb plezier!


dinsdag 8 december 2015

Gelli-plate play......


Hi there Gelli-plate fans,

Today I have one of the Gelli-plate backgrounds from my first blogpost finished for you. Sometimes people ask...it's nice all these backgrounds but what to do with it....well there are many possibilities and this is one of them........like my last blogpost I have added Pan Pastels, a fineliner and some white accents.
This was one of the backgrounds from my first blogpost, if you did not see it yet, just look here......

Hallo Gelli-plate fans,

Vandaag heb ik een van de GP achtergronden van mijn eerste blogpost afgemaakt. Soms vragen mensen.......wel leuk al die achtergronden ....maar wat doe je er nu mee? Nu, er zijn veel manieren en dit is er een van.... zoals bij de laatste blogpost heb ik hier ook weer Pan Pastels, een fineliner en wat witte accenten op verwerkt.
Dit was een van mij achtergronden van de eerste GP blogpost, als je die nog niet gezien hebt, kijk dan hier.....


A step by step for you.......
I have used Versamark, a sponge and actually 3 colors of Pan Pastels:
Pan Pastel Magenta: 430.5
Pan Pastel Ultramarine shade: 520.3
Pan Pastel Titanium White:100.5

Een stap voor stap voor jullie......
Wat ik heb gebruikt zie je hierboven


I have put the positive mask on my background and covered the rest.......now applying some Versamark with a sponge.

Ik heb het positieve gedeelte van het masker op de achtergrond gelegd en de rest even afgeplakt. Nu wat Versamark aangebracht met het sponsje.


This is how it looks like after applying the Pan Pastel Magenta and Ultramarine shade. I left some part out so it created a more or less ' white area'.

Dit is hoe het eruit zag nadat ik Pan Pastels Magenta en Ultramarine shade had aangebracht. Ik heb een gedeelte niet bewerkt met Pan Pastel zodat er een ' witte' plek ontstaat.

een close-up......

Now, put the negative mask again in place.....
Nu het negatieve masker erop leggen.......

And apply some Pan Pastel Titanium white around(did not use Versamark here) 

En nu wat Pan Pastel Titanium white eromheen aanbrengen (zonder Versamark)

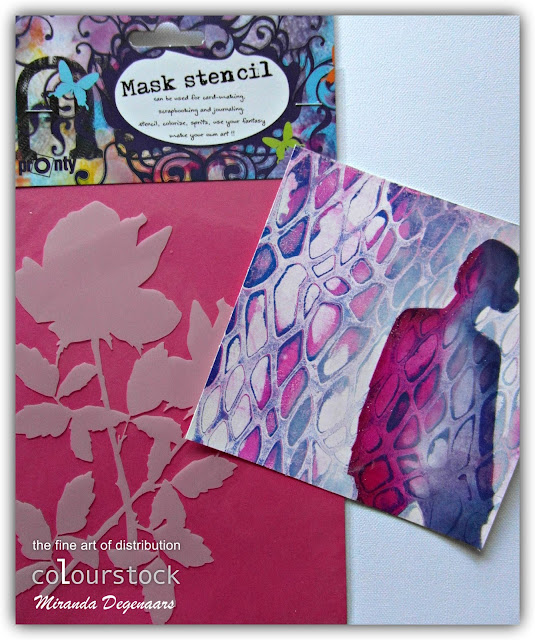
Here you can see the rose mask of Pronty which I shall be using.......
Hier zie je het rozen masker van Pronty wat ik ga gebruiken......

First a bit of sponging with the Versamark in the open areas of the rose mask
Than I have applied the Pan Pastel Ultramarine shade with a Pan Pastel toll around the rose mask

Eerst wat gesponst met  Versamark in de open gedeeltes van het rozenmasker
Toen de Pan Pastel Ultramarine shade aangebracht met een Pan Pastel tool.

Than I have accentuated the rose shape with a Copic Multiliner 5 and for the silhouette I have used Copic Multiliner 2

Toen heb ik de roos vorm geaccentueerd met een Copic multiliner5 en voor het silhouette heb ik de Copic multiliner 2 gebruikt


And the final card, added the word Dream from the Artistic Inspirations sheet from Chocolate Baroque and a swirl Die cut which I have embossed with clear embossing powder.

En tenslotte de totale kaart waarbij ik het woord " Dream' van de Artistic Inspirations sheet van Chocolate Baroque heb gestempeld en een swirl gesneden die ik later heb geembosst met clear embossingpoeder.


Hope to have inspired you with one of the many ways to work with a GP background, this time it has become a card.
Thanks for your visit and till next time!

Ik hoop jullie weer geïnspireerd te hebben met een van de manier om een GP achtergrond te verwerken tot een kaart. 
Bedankt voor je bezoek en tot de volgende keer!


' DANCE'

While I dance I cannot judge,
I cannot hate, I cannot separate myself from life.
I can only be joyful and whole.
That is why I dance.”
~Hans Bos