woensdag 19 maart 2014

I am dreaming of castles in the air..........Ik droom van luchtkastelen....

Hi there,

Today 3 creations made with the lovely magical 'Fantasy Castles' and 'Magical Landscapes' from Chocolate Baroque. When I had a great crafting day with lovely friends I've made these.........using Dylusion inks, Distress inks,  Pan Pastels and colour pencils.

Here they are.........fly away with me into this dreamland.........I did not create cards with them but I am thinking to put them in an Art Journal.........
As you can see I've used a lot of stencils here ( Crafters workshop/Dutch Doobadoo/I-stencils/Tim Holtz and Memory box mixed together ........I am a big stencil fan.......

Hallo lieve mensen,

Vandaag 3 creaties met de mooie magische 'Fantasy Castles'en 'Magical Landscapes' van Chocolate Baroque. Tijdens een heerlijke stempeldag met lieve vriendinnen heb ik deze gemaakt.........met Dylusion inks, Distress inkt, Pan Pastels en kleurpotloden.

Hier zijn ze......vlieg je met me mee naar dit droomland.......ik heb er nog geen kaarten van gemaakt maar ik hou ze denk ik voor een Art Journal......
Zoals je kunt zien heb ik een heleboel stencils gebruikt hier( Crafters workshop/Dutch Doobadoo/I-stencils/Tim Holtz en Memorybox samen......de een had net een leuker spikkeltje dan de ander....Ik ben een echte stencil fan 


Well, hope to have inspired you with these dreamy images.........
Thanks for visiting and hope to see you next time!

Zo, hoop jullie geinspireerd te hebben met deze dromerige werkjes.......
Bedankt voor je bezoek en hoop je volgende keer weer te zien!


maandag 17 maart 2014

Where do I get my inspiration...........Waar word ik door geinspireerd?


Hi there,

Today I will show you a Pan Pastel creation, something else than you maybe used of from me.........I was inspired by lovely artwork that I saw on Pinterest. So I will also mention the artist name and site.
It's a good thing to be inspired by someone else but it's also nice to mention the artist who inspired you. At least that is my opinion. I have several boards on my Pinterest page and I love looking at all the beautiful and colourful inspirations there are to find on Pinterest.

This is the original artwork(watercolour) and I love the title which the artist has given her work. We are Light.  I quote: 'I like the idea that human beings being composed out of stardust'........
You can find her work here
page background inspiration
made by Annya Kai

and now on to my interpretation..........using Pan Pastels. Easier to control than water paints, but I also love to do water painting. 
These are the materials I've used:
Pan Pastels:
Magenta tint 430.8
Magenta shade 430.3
Violet tint 470.8
Violet 470.5
Phtalo blue tint 560.8
Phtalo blue 560.5
Phtalo green tint 620.8
Phtalo green 620.5
Permanent green tint 640.8
Permanent green 640.5
White 100.5
Eraser pencil 

White markers:
Molotov marker
Posca marker
Signo ball pens UM-153 and 120AC

Stencils:
Dutch Doobadoo
Memorybox
Crafters workshop
Viva Decor Kristal gel hologram

And a step by step tutorial, I hope you like to see it as much as I did creating it..........

This is the colourpalette I've used.


I've started applying the lightest colours with the large oval sponge(like that one)
I've used fixative after every layer
 Than I've used the darker shades to give more power to the colours
Than I've used the two last colours which are even more stronger (Phtalo blue and green)


I've used several stencils and applied Versamark with a sponge, than I've applied the Pan Pastel Violet and also erased some circles to create some light balls......


Than the fun starts adding white dots with the different size of white markers. I've noticed that the larger tip of the Molotov marker created the largest dots, than the Posca marker because it has a metal tip and than the two sizes Signo ball pens.

I've deceided to add some more fun.......could not stop.......and added Viva Kristal gel using a palette knife and another Crafters stencil.
Here you can see the texture and the lovely shine it gives.......it looks a bit bubbly but after drying it will be OK


And the final layering onto some white and display on purple cardstock.
Some views from a different angle.....
This gel has such a nice effect, there are some pieces of mica in it........


Well, this is my contribution for the Pan Pastel blog this time but I've translated it only here. Thanks for visiting, appreciate your comments and hope to see you next time!


dinsdag 11 maart 2014

Pan Pastel workshop cards........more metallics


Hello there,

Today I will show you the two Pan Pastel metallic cards which we've made at several workshops.
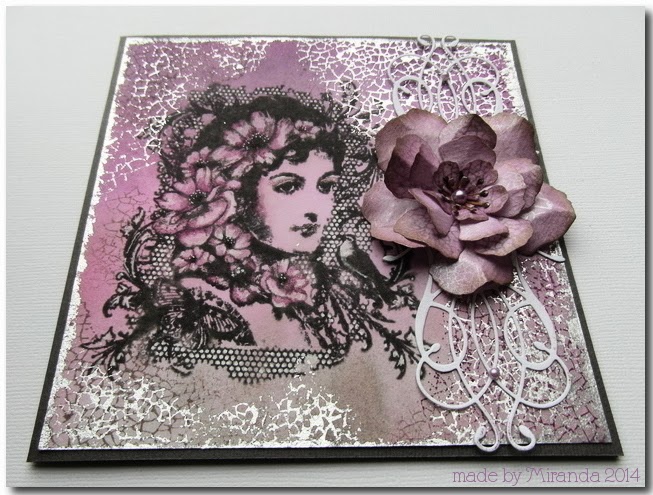
The participants could choose between a masculine or feminine card. Here they are.........starting with the feminine one........


Hallo allemaal,

Vandaag laat ik jullie twee Pan Pastel metallic workshopkaarten zien die we gemaakt hebben tijdens diverse workshops.
De deelnemers konden kiezen uit een vrouwelijke en mannelijke kaart. Hier zijn ze........beginnend met de vrouwelijke versie........


And for those who like to know......a step by step instruction and a list of materials:
En voor degenen die het willen weten.......een stap voor stap uitleg en een lijst met materialen:
De genoemde materialen zijn te koop bij het 't Hobbyschuurke in Ridderkerk.

Feminine card
Materials:
Metallic Pan Pastels:
light gold/rich gold

Metallic card cream
Metallic paper thin(for die cutting flowers)
A4 Cardstock linen structure cream
Crealies creative petal no.6
Just rite text stamp
Versamark ink
Heattool
embossingpowder gold
                                                             Crealies bits& pieces no.4
ribbon/pearls

Step by Step instructions:
1. Fold an A4 linen card in half and resize to 14.5x20.5 cm
2. Emboss the metallic paper with the 3d emboss.folder 2x(1 for the flap)
3. Cut both just outside the embossed lines
4. Stamp with Versamark along the edges of the base card using the Viva swirls
5. Add the light gold Pan Pastel
6. Stamp the bits&pieces(dots) stamp with Versamark at the bottom of the first layer and emboss with gold emboss.powder using a heattool.
7. Stamp the swirls with Versamark in the same place and add Pan Pastel rich gold
8. Apply Versamark with a Darice sponge over the extra embossed layer and add Pan Pastel rich gold.
9. Apply this top layer with foam tape
10. Emboss the text on the label using Versamark and heat embossing gold EP
11. Apply the card on an extra layer using light brown cardstock
12. Add the bow on the left side and a faux loop on the right.
13. Add them both on the base card

14.Flower:
I've used 8 petal elements each round starting with the largest size working from the outside to the center. I've punched a little square( see photo) and divided in 8 to have a guide where I could put the petals.  I've used a tacky glue to put all petals together and be sure the center is not too wide! Than add some pearl in the center and put the flower with tacky glue on the card.
15. Add some pearls on the card to give some nice accents.

punch a square and divide in 8 for a little help to build the flower
Stap voor stap instructie:
1. Vouw een A4 linnen structuur kaart in 2 en maak op maat to 14.5x20.5 cm
2. Emboss het metallic papier met de 3d emboss.folder 2x(1x  voor de flap)
3. Maak op maat en knip de flap netjes langs de embossingsranden
4. Stempel met Versamark langs de randen van de basiskaart met de swirl van Viva decor.
5. Breng hierop de licht gouden Pan Pastel aan
6. Stempel de spikkel stempel van Crealies met Versamark langs de onderkant van de eerste laag en emboss met goud emboss.poeder en verhit met heattool.
7. Stempel hier met Versamark de swirls over en breng rich gold Pan Pastel aan.
8. Breng met een Darice sponsje(harder materiaal) een laag Versamark op de embossinglaag aan op de aparte flap en hierover weer Pan Pastel  rich gold.
9. Plak de flap op met foam tape
10. Emboss de tekst op de label met gouden emboss.poeder en heattool
11. Mat de emboss.kaart op een licht bruine kaart 
12. Bevestig een strik aan de linkerzijde en een nep lus aan de rechterzijde met db. zijdig tape
13. Plak het op de basiskaart
14. Bloem
Ik heb 8 bloemblad elementen voor elke ronde gebruikt beginnend met de grootste maat werkend van buiten naar binnen. Ik heb een klein vierkant geponst(zie foto) en hierop een vlakverdeling gemaakt als leidraad voor het plakken van de elementen. Ik heb een tacky glue gebruikt voor het lijmen van de bloem en zorg ervoor dat het centrum(hart) niet te groot is anders hou je een ruimte over. Dan een mooie parel in het midden en lijm de bloem op je kaart met de tacky glue.
15. Breng meer parels aan als accenten.


pons een vierkant en verdeel in 8 als hulpmiddel en ondergrond om de bloem op te bouwen

And the 2nd one........masculine.........they could also choose between two colour combinations
En de tweede........mannelijke versie.......ook was er keus uit twee kleurencombinaties


Masculine card
Materials:
Pan Pastels:
Bronze/Copper/Pewter
Distress inks: Walnut Stain/Vintage Photo
Metallic stain Tarnished Brass
Versamark
embossingpowder Copper/Silver
Crealies Creative Petal no.6
brads 
A4 line structure card dark brown or copperbrown
Metallic cardstock dark brown or copper
Thin metallic paper for flower
heattool
tacky glue

And a step by step of this one:
1. Fold an A4 linen card in half en resize to 14.5x20.5 cm
2. Emboss the metallic paper with the 3d emboss.folder
3. Cut along the embossed edge
4. Use a Darice sponge to apply a layer of Versamark over the embossed areas
5. Apply several shades of the metallic Pan Pastels
6. Stamp the craquele stamp on the edges of the base card with Versamark
7. Apply a metallic Pan Pastel
8. Heat emboss the gears partially with embossing powder using both colours copper and silver
9. Apply also some metallic Pan Pastels on the open parts of the gears
10. Create flower as in femine card(see photo)
11. Go with the Distress stain along the edges of the embossed card
12. Attach on base card with tape or glue
13. Apply gears and flower on card

En ook een beschrijving van deze kaart:
1. Vouw een A4 linnen kaart in twee en maak op maat tot 14.5x20.5 cm
2. Emboss het metallic papier met de 3d emboss.folder
3. Knip af langs de geembosste randen
4.Gebruik het Darice sponsje om een laag Versamark aan te brengen op de geembosste delen
5. Breng diverse kleuren metallic Pan Pastels aan
6. Stempel de craquele stempel met Versamark langs de randen van de basis kaart
7. Breng metallic Pan Pastel aan
8. Emboss de raderen gedeeltelijk met emboss.poeder, gebruik beide kleuren koper en zilver
9. Breng op de open gedeeltes wat metall. Pan Pastel aan
10. Maak de bloem zoals bij bovenstaande kaart(zie foto)
11. Ga met de Distress stain langs de rand van de geembosste kaart
12. bevestig deze op de basis kaart met tape of lijm
13. Plak de raderen en bloem op de kaart

Genoemde materialen zijn te koop bij 't Hobbyschuurke in Ridderkerk.

Well, it was a lot of writing here but I hope I made it clear to you!

zaterdag 8 maart 2014

Demo cards with Gilded Flakes and Indigo Blue.......


Hi there,

A few weeks ago I had a two day demo and did create several cards using the Indigo Blue Gilded Flakes and stamps. Here are some of those creations........I will show the others too another time

I 've never been working with the flakes before and going all the way with them..... I must say I did enjoyed it very much! It's a nice add to existing shimmers and techniques.

Hallo daar,

Een paar weken geleden had ik twee demo dagen bij Doe@Ding in Spijkenisse. Het was weer gezellig en weer een hoop bekende gezichten gezien en gesproken. Ik had diverse kaarten gemaakt met de Indigo Blue gilded flakes en stempels. Hier zijn wat van de creaties........Ik zal de anderen te zijner tijd ook laten zien.

Ik had nog nooit met de flakes gewerkt en gaandeweg kreeg ik er steeds meer plezier in......het is een mooie aanvulling op de al reeds bestaande 'glimmers' en technieken.


Here you can see the flakes better.........I've used them on the craquele stamp using silver flakes.(Sheffield steel)
Hier kun je het effect van de flakes wat beter zien in het licht.......ik heb ze gebruikt op de craquele stempel met zilveren flakes(Sheffield steel)
De Indigo Blue materialen kun je hier vinden


And two other creations using a colour combination that I don't use very often.....very soft shades......I've worked on a canvas structure paper and I like it. It works very well with Pan Pastels but also with the acrylic bloc technique using water. At this card I've used no flakes but Perfect Pearls on some areas. Also added the pearls on the flowers. On the end of the stamens I've used a black Wink of Stella pen which gives a lovely shimmer! The small leaves are from Cheery Lynn.

En twee andere creaties met een kleurcombinatie die ik niet vaak gebruik....heel zachte tinten......Ik heb gewerkt op canvas papier en ik vind het zulk heerlijk papier. Zowel voor de Pan Pastels als natte technieken zoald de acrylbloc techniek, super! Op deze kaart heb ik geen flakes gebruikt maar perfect pearls op sommige gedeeltes en ook op de bloemen. Op het eind van de meeldraden heb ik een zwarte Wink of Stella marker gebruikt wat een prachtig glimmertje geeft. Deze markers hebben een fijn kwastje en zijn in diverse kleuren verkrijgbaar.


Lovely flowers from the Spellbinders blooms 3
And the last one for now.......also very subtle colours

Mooi bloem snijmal van Spellbinders, Blooms 3
en de laatste voor nu......ook weer subtiele kleuren


The use of silver flakes really pops out in this one, lots of layers with Distress inks, perfect pearls and flakes......

Het effect van de zilveren flakes springt er echt uit hier, veel lagen met Distress inkten , Perfect pearls en flakes....

Thanks for visiting, hope to see you next time!
Bedankt voor je bezoekje en tot de volgende keer!


vrijdag 7 maart 2014

Wavy lines....Ornate leaves from designs by Ryn


Hi there,

Judikins stencil - Splash Finally I had some time to play with the lovely designs by Ryn. This time I've used the Ornate Leaves set, a set of leaves with a lovely wavy pattern. Also combined it with some circles of the Circle cluster set.I had this background made some time ago with a Judi Kins stencil and thought the wavy lines of the background would be a good match with the Ornate leaves.
This is the stencil I've used......

Hallo allemaal,
Eindelijk had ik weer eens wat tijd om met de mooie ontwerpen van designs by Ryn te spelen. Ik heb hier de Ornate Leaves set gebruikt, een set van 3 maten bladeren met een mooi golvend motief. Ook gecombineerd met de cirkels van de Circle Cluster set .Deze achtergrond had ik liggen en paste mooi bij de golvende lijnen van de blaadjes.....

And here is the card......also used the Spellbinders wavy edge die.........
En hier is de kaart........ook de Spellbinders rand gebruikt.......
A2 Curved Borders Onecurved borders one

The leaves are embossed with silver and coloured with waterbased markers. Added some hotfix gemstones for an extra bling........I've just made a fantasy lay-out with the circles and leaves ......so a bit of playing around........( sometimes it takes quit a while doing that LOL)

De blaadjes zijn geembosst met zilver en gekleurd met aquarel markers(Tombo's). Nog wat hotfix steentjes erbij voor extra bling.....Ik heb gewoon een fantasie lay-out gemaakt met de cirkels en blaadjes....gewoon een beetje spelen en schuiven........(daar kan ik soms wel eens lang over doen haha)

some other views........

Most of the time I create a lot of backgrounds in a one time play so I have always something to match......
Meestal maak ik een hele serie achtergronden ineens zodat ik altijd iets voor het grijpen heb wat erbij past......

Next time more.......with the designs of Ryn.....(work in progress)
Volgende keer meer........met de designs van Ryn........(werk in uitvoering)


dinsdag 4 maart 2014

'My secret place'.........


Hi there,

Today my creation with one of the lovely new castles from the 'Fantasy Castles'. These stamps are great to colour and to visualize your own 'magical' place! I've made this one on soft blue Basic Grey scrap paper.
I've stamped with shades of blue and green Memento inks and coloured with my Derwent Soft Colour and added gold accents on the minarets with Viva Maya gold paint.

Hallo allemaal,

Vandaag mijn creatie met de mooie nieuwe kastelen van de 'Fantasy Castles' van Chocolate Baroque. Deze stempels zijn weer heerlijk om te kleuren en om je eigen magische plek te visualiseren! Ik heb deze gemaakt op zacht blauw Basic Grey scrap papier.
Ik heb gestempeld met blauwe en groene tinten Memento inkt en gekleurd met Derwent Soft Colour en accenten op de koepels met Viva Decor Maya gold verf. (te koop bij Doe@Ding)


And of course there are lots of great CB sheets which matches perfectly with these stamps. So to frame this lovely castle I've used also 'Wisteria Lane' and Spring Foliage and my favorite feathered leaf from the 'September Fairy'.

En natuurlijk zijn ze ook weer te combineren met diverse van de CB sheets die er perfect bij passen! Dus om het kasteel in een mooi frame te zetten heb ik ook gebruikt: Wisteria Lane' and Spring Foliage en mijn favoriete varen blad van de 'September Fairy'.

Well, hope to have inspired you and appealed to your imagination to create your own 'magical' place with these stamps.Also beautiful to work with in an Art Journal( hopefully I will create one in this lifetime)

Thanks for your visit, your comment is always appreciated and hope to see you next time.
 Zo, hoop jullie weer geïnspireerd te hebben en een beroep te hebben gedaan om je eigen 'magische'plek te creëren met deze stempels.......ook prachtig in een Art Journal( waar ik hopelijk ooit nog eens aan toe ga komen)


' DANCE'

While I dance I cannot judge,
I cannot hate, I cannot separate myself from life.
I can only be joyful and whole.
That is why I dance.”
~Hans Bos